Télécharger la dernière version de WordPress (fr.wordpress.ORG pas .com)
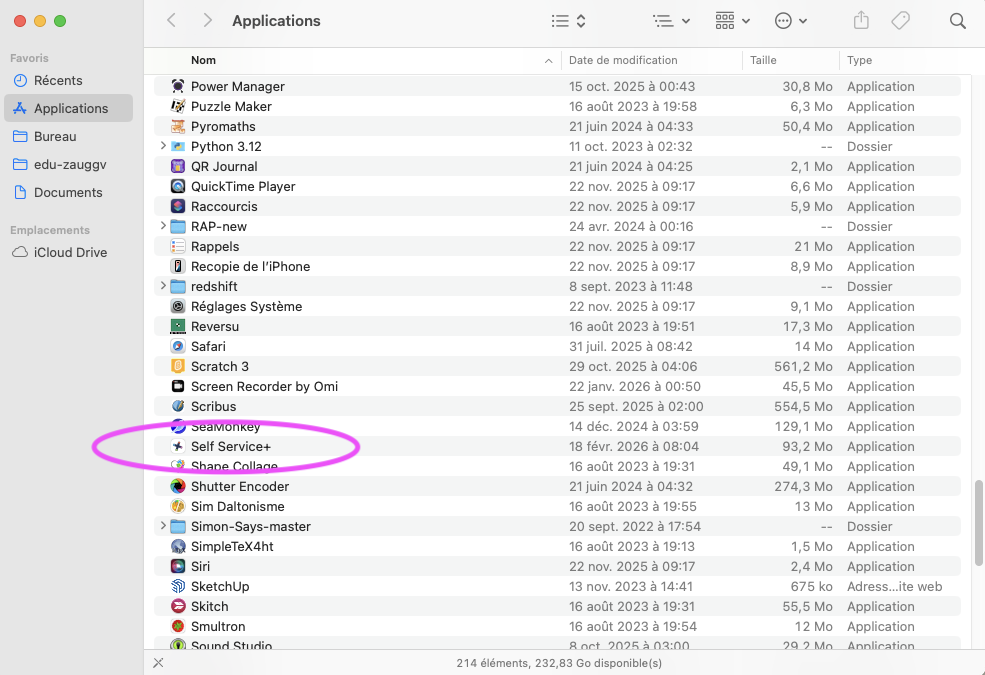
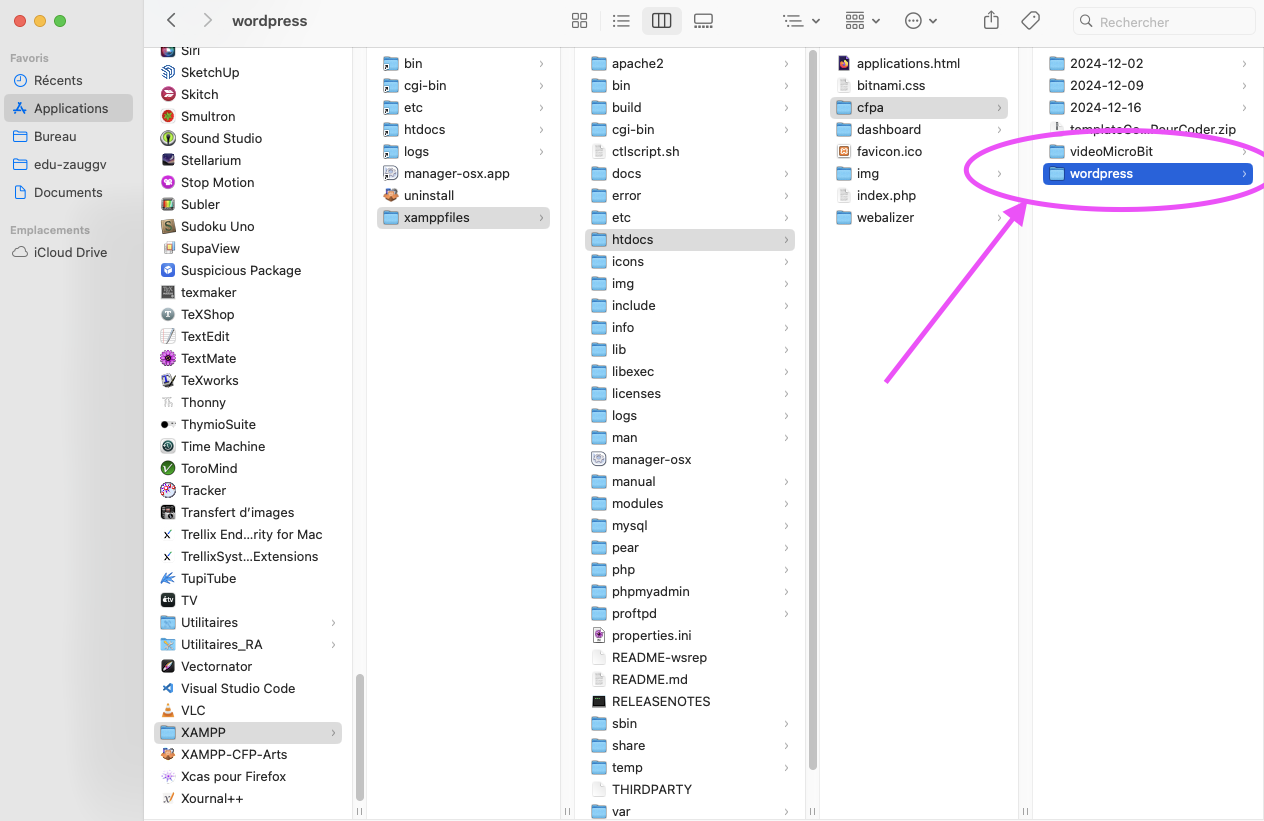
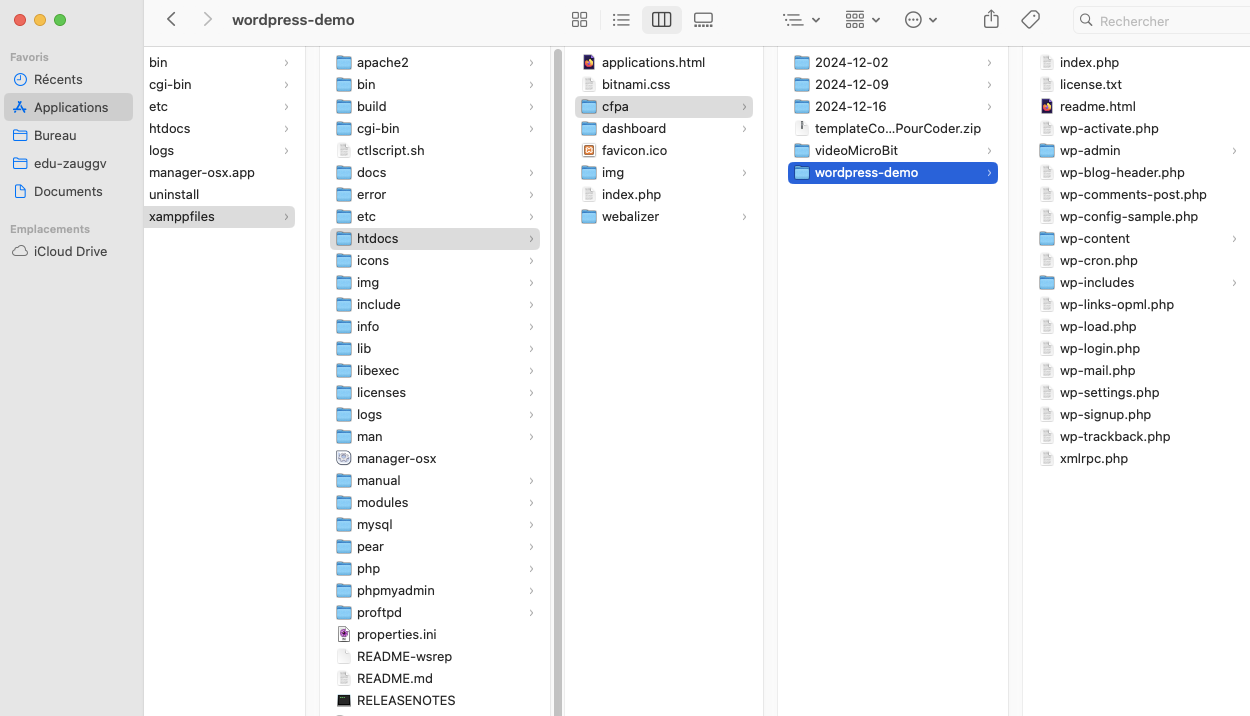
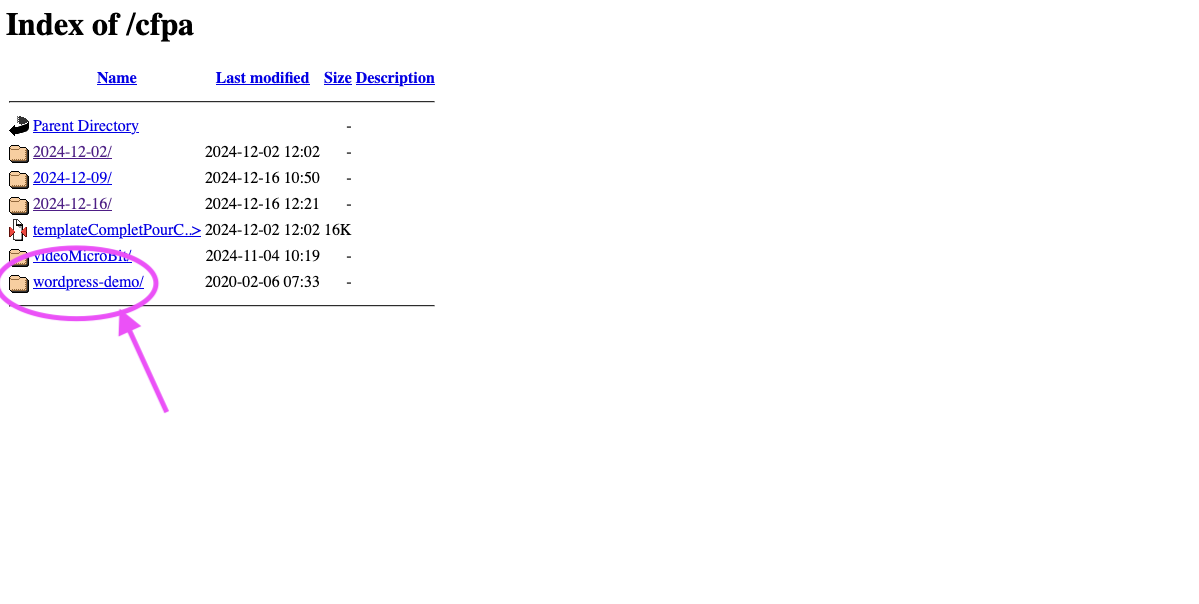
Copier le dossier dans votre server local (applications/xampp/htdocs/cfpa/)
Renommer le dossier « wordpress »
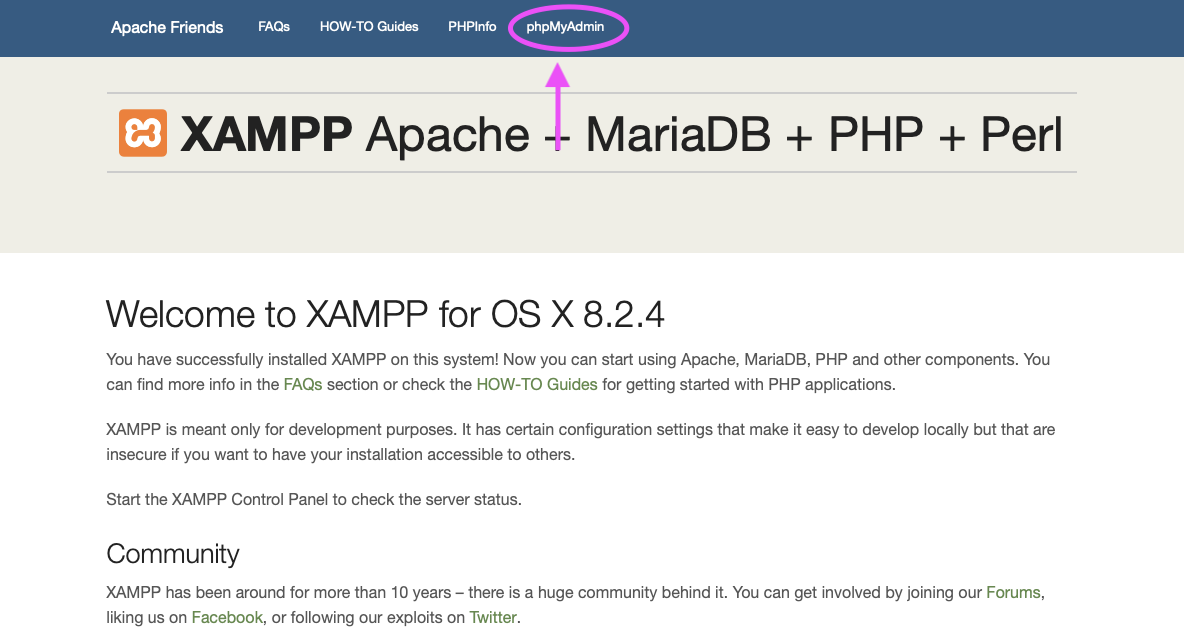
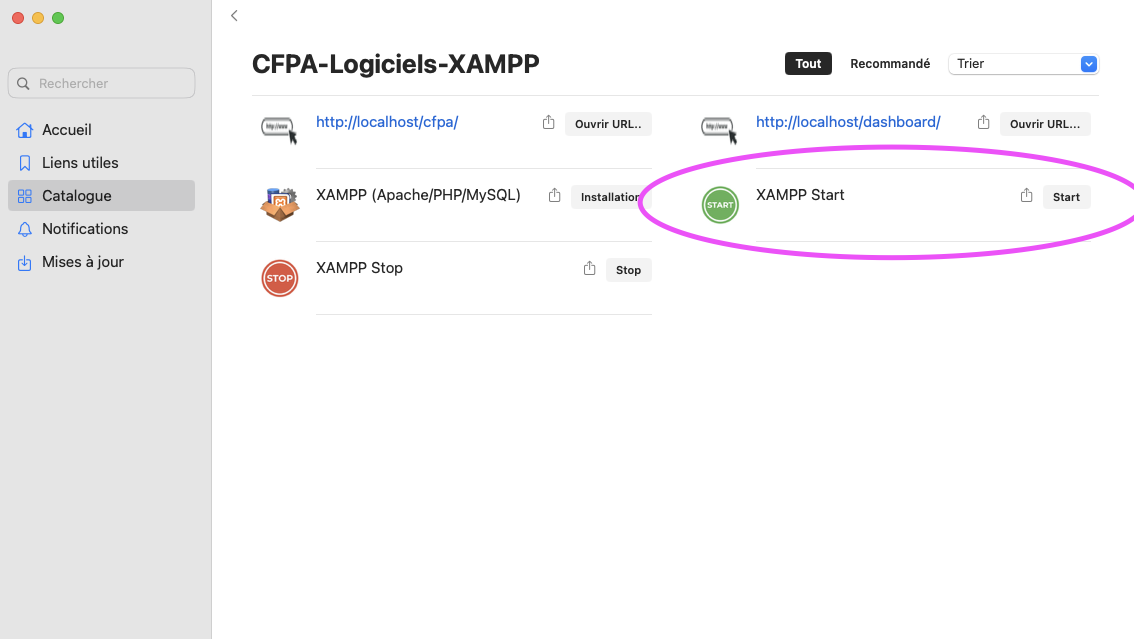
Redémarrer XAMPP pour redéfinir les drits d’accès sur les fichiers
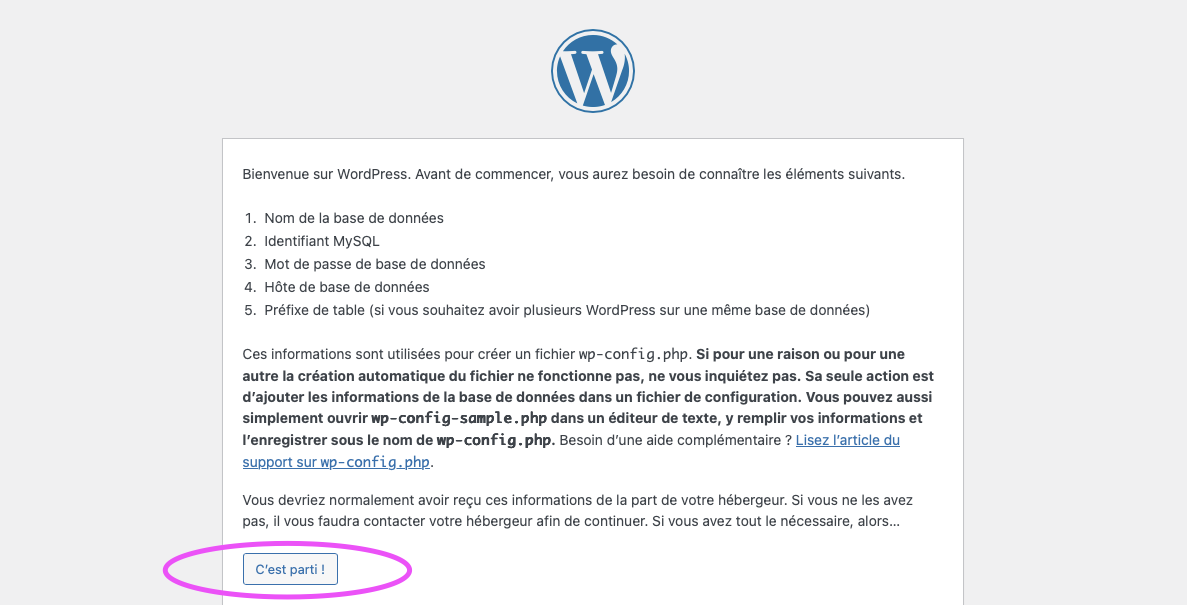
Part. 3: installation de WordPress
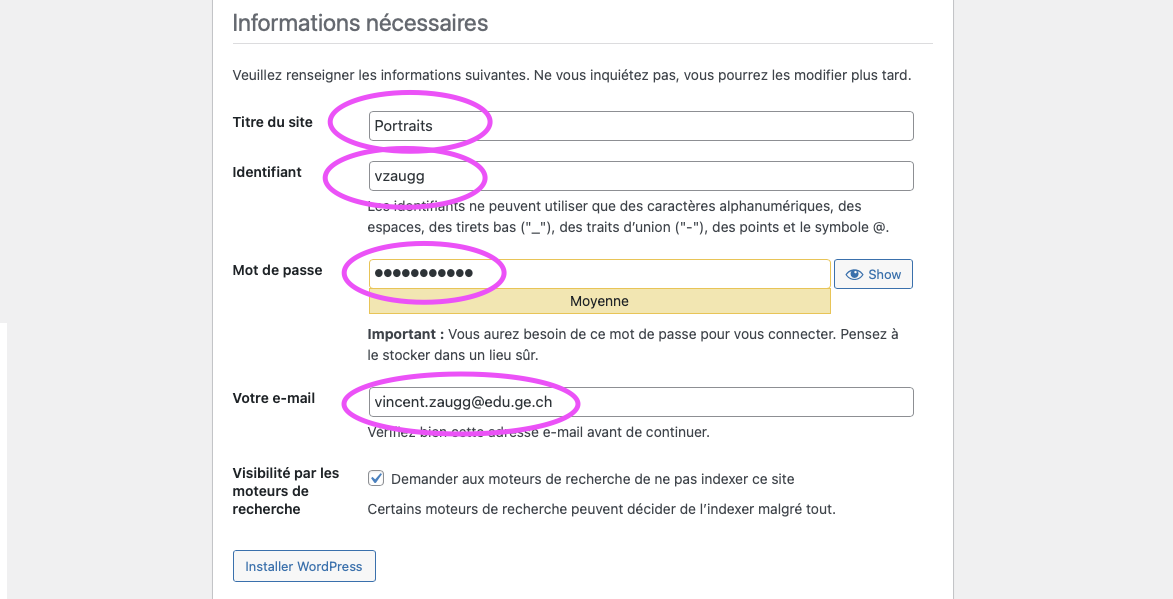
Entrez l’url de votre server local: http://localhost/cfpa/
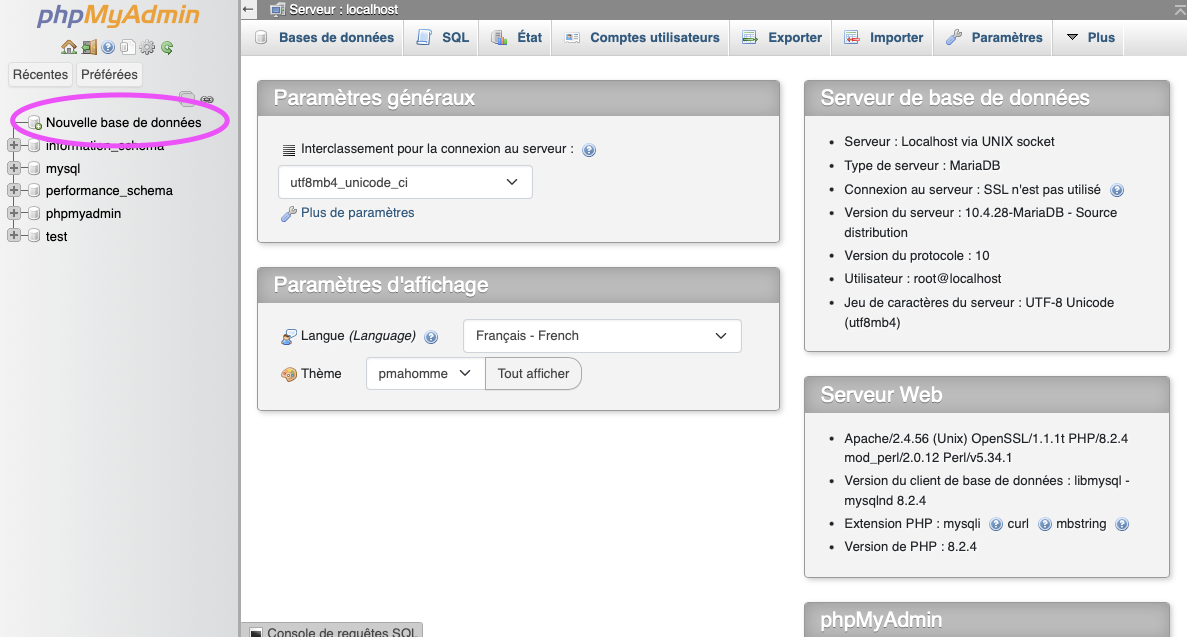
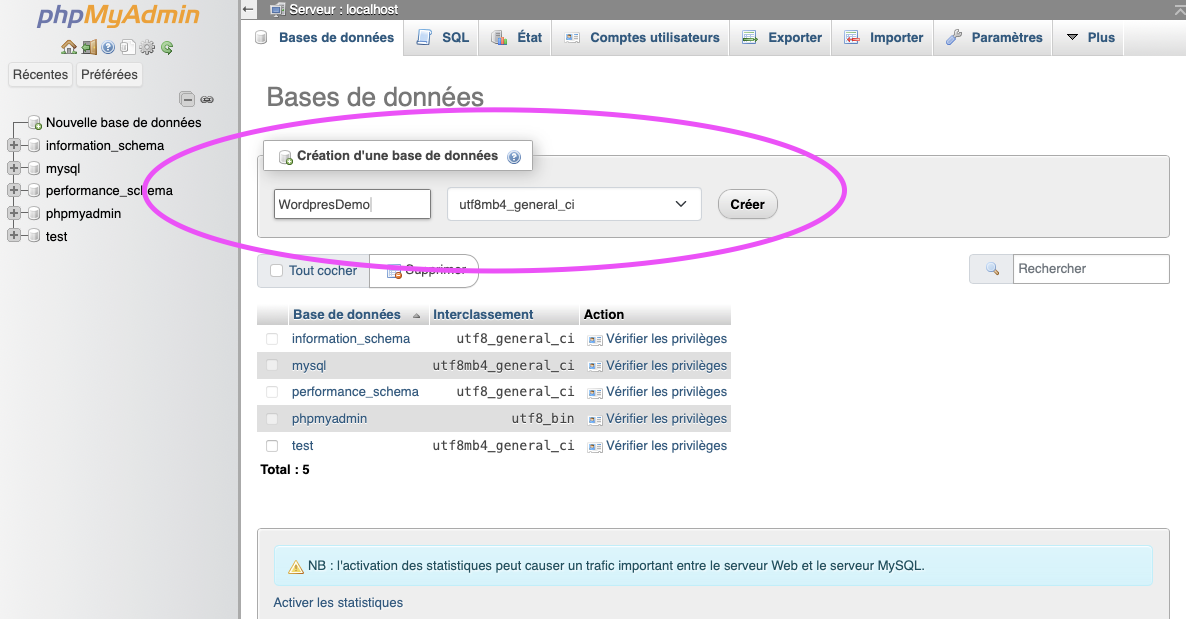
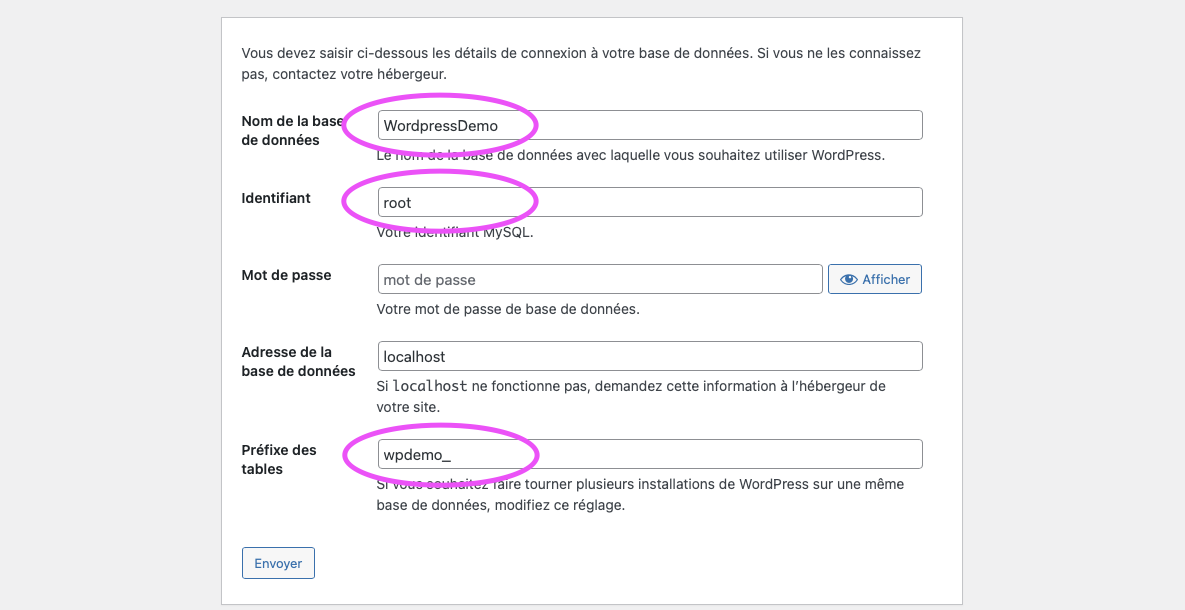
Entrer la nom de la base de données, l’identifiant « root », pas de mot de passe, adapter le préfixe des tables an gardant le « _ »
Pour changer la langue de WordPress en local, accédez à Réglages > Général > Langue du site. Si les options sont absentes, forcez la connexion directe dans wp-config.php en ajoutant define('FS_METHOD', 'direct'); pour permettre le téléchargement des packs de langue.
<!-- Slider main container -->
<div class="swiper">
  <!-- Additional required wrapper -->
  <div class="swiper-wrapper">
    <!-- Slides -->
    <div class="swiper-slide">Slide 1</div>
    <div class="swiper-slide">Slide 2</div>
    <div class="swiper-slide">Slide 3</div>
    ...
  </div>
  <!-- If we need pagination -->
  <div class="swiper-pagination"></div>

  <!-- If we need navigation buttons -->
  <div class="swiper-button-prev"></div>
  <div class="swiper-button-next"></div>

  <!-- If we need scrollbar -->
  <div class="swiper-scrollbar"></div>
</div>
Éditez le fichier archive.php Ajouter la structure dansla boucle « while »
<?php
/**
 * The template for displaying archive pages
 *
 * @link https://developer.wordpress.org/themes/basics/template-hierarchy/
 *
 * @package The_Way_Ball_Go_Theme
 */

get_header();
?>

	<main id="primary" class="site-main">
		<?php if ( have_posts() ) : ?>

			<header class="page-header">
				<?php
				the_archive_title( '<h1 class="page-title">', '</h1>' );
				the_archive_description( '<div class="archive-description">', '</div>' );
				?>
			</header><!-- .page-header -->


			<?php
			/* Start the Loop */
			while ( have_posts() ) :
				the_post();

				/*
				 * Include the Post-Type-specific template for the content.
				 * If you want to override this in a child theme, then include a file
				 * called content-___.php (where ___ is the Post Type name) and that will be used instead.
				 */
				get_template_part( 'template-parts/content-archive', get_post_type() );

			endwhile;

			the_posts_navigation();

		else :

			get_template_part( 'template-parts/content', 'none' );

		endif;
		?>


	</main><!-- #main -->

<?php
get_sidebar();
get_footer();
Fichier modifié
<?php
/**
 * The template for displaying archive pages
 *
 * @link https://developer.wordpress.org/themes/basics/template-hierarchy/
 *
 * @package The_Way_Ball_Go_Theme
 */

get_header();
?>

	<main id="primary" class="site-main">
		<?php if ( have_posts() ) : ?>

			<header class="page-header">
				<?php
				the_archive_title( '<h1 class="page-title">', '</h1>' );
				the_archive_description( '<div class="archive-description">', '</div>' );
				?>
			</header><!-- .page-header -->

<!-- Slider main container -->
<div class="swiper">
  <!-- Additional required wrapper -->
  <div class="swiper-wrapper">


			<?php
			/* Start the Loop */
			while ( have_posts() ) :?>

				<div class="swiper-slide">
<a href="<?php the_permalink(); ?>"
<?php the_post_thumbnail('thumbnail');?>
<?php the_title();?>
</a>
</div>


			<? endwhile;?>

</div>
  <!-- If we need pagination -->
  <div class="swiper-pagination"></div>

  <!-- If we need navigation buttons -->
  <div class="swiper-button-prev"></div>
  <div class="swiper-button-next"></div>

  <!-- If we need scrollbar -->
  <div class="swiper-scrollbar"></div>
</div>


			<?php the_posts_navigation();

		else :

			get_template_part( 'template-parts/content', 'none' );

		endif;
		?>


	</main><!-- #main -->

<?php
get_sidebar();
get_footer();
/**
 * Autoriser l'upload de tous types de format dans les médias
 */


add_filter('upload_mimes', 'wpm_myme_types', 1, 1);

function wpm_myme_types($mime_types){
	$mime_types['svg'] = 'application/postscript'; //On autorise les .svg
    $mime_types['glb'] = 'application/postscript'; //On autorise les .glb
    return $mime_types;
}
3. Copier le script dans le header.php
Éditez le fichier header.php et copier ce script juste après le début su div id= »page »:
4. Intégrer le script dans le contenu de vos articles
Éditez le fichier content.php (l’affichage du contenu d’un article) et copier ce script JUSTE AVANT la fermeture de l’article </article><!-- #post-<?php the_ID(); ?> -->
<script type="module">


 import * as THREE from 'three';
 import { OrbitControls } from  '<?php bloginfo('template_directory'); ?>/threejs/node_modules/three/examples/jsm/controls/OrbitControls.js';
 import { GLTFLoader } from '<?php bloginfo('template_directory'); ?>/threejs/node_modules/three/examples/jsm/loaders/GLTFLoader.js';
 import { DRACOLoader } from '<?php bloginfo('template_directory'); ?>/threejs/node_modules/three/examples/jsm/loaders/DRACOLoader.js';


let container, containerBox;
let cameraPersp, cameraOrtho, currentCamera;
let orbit, scene, raycaster, renderer, control;
const clock = new THREE.Clock();


init();
render();
animate();


function init() {
 container = document.getElementById( 'capture-<?php the_ID(); ?>' );
 containerBox = container.getBoundingClientRect();
 console.log(containerBox.width, containerBox.height);

 renderer = new THREE.WebGLRenderer( { alpha: true } );
 renderer.setPixelRatio( window.devicePixelRatio );
 renderer.setSize( containerBox.width, containerBox.height );
 // setClearColor(Couleur de fond de la 3D, transparance de 0 à 1)
 renderer.setClearColor( 0xffffff, 0 ); // the default

 container.appendChild( renderer.domElement );
 const aspect = containerBox.width / containerBox.height;

 // THREE.PerspectiveCamera(Champ de Vision FOV, ratio, près, loin)
 // currentCamera.position.set(x,y,z) // position de la caméra
 cameraPersp = new THREE.PerspectiveCamera( 33, aspect, 0.1, 1500 );
 currentCamera = cameraPersp;
 currentCamera.position.set( 1, 1, 0);
 currentCamera.lookAt( 0, 0, 0 );

 scene = new THREE.Scene();
 // THREE.Fog(Couleur du brouillard, transparance de 0 à 1, distance)
 scene.fog = new THREE.Fog( 0xffffff, 1, 1500 );

 // THREE.HemisphereLight(Couleur du la lumière, Couleur de l'ombre)
 const hemiLight = new THREE.HemisphereLight( 0xffffff, 0xffffff );
 // hemiLight.position.set(x,y,z) // Position de la lumière en x,y,z
 hemiLight.position.set( 0, 50, 0 );
 scene.add( hemiLight );

 const dracoLoader = new DRACOLoader();
 dracoLoader.setDecoderPath( '<?php bloginfo('template_directory'); ?>/threejs/node_modules/three/examples/js/libs/draco/gltf/' );

 const loader = new GLTFLoader();
 loader.setDRACOLoader( dracoLoader );

 loader.load( '<?php echo $captureUrl;  ?>', function ( gltf )  {
	 const model = gltf.scene;
	 model.name = 'capture-<?php echo $captureId; ?>'
	 //position initiale
	 model.position.set( 0, 0, 0 );
	 //taille initiale
	 model.scale.set( 1, 1, 1 );
	 scene.add( model );
 });

 orbit = new OrbitControls( currentCamera, renderer.domElement );
 orbit.update();
 orbit.addEventListener( 'change', render );

 window.addEventListener( 'resize', onWindowResize );
}

function onWindowResize() {
 const aspect = containerBox.width / containerBox.height;
 cameraPersp.aspect = aspect;
 cameraPersp.updateProjectionMatrix();
 renderer.setSize( containerBox.width, containerBox.height );
 render();
}

function animate() {
requestAnimationFrame( animate );
renderer.render( scene, currentCamera );
}

function onPointerMove( event ) {
 pointer.x = ( event.clientX / containerBox.width ) * 2 - 1;
 pointer.y = - ( event.clientY / containerBox.height ) * 2 + 1;
}

function render() {
 renderer.render( scene, currentCamera );
}

</script>
5. Intégrer la zone d’affichage de l’objet 3D
Éditez toujours le fichier content.php (l’affichage du contenu d’un article) et copier ce code JUSTE APRÈS l’ouverture de l’article <article id="post-<?php the_ID(); ?>" <?php post_class(); ?>>
Éditez le fichier style-custom.css et définissez la hauteur du canvas
/*
** 3D
*/
.canvas-box {
    height: 500px;
}
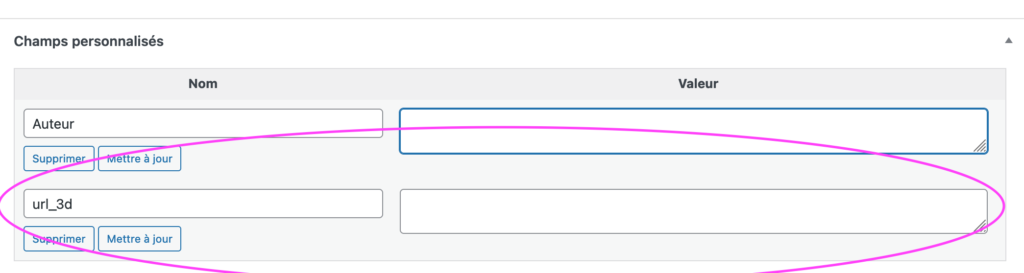
7. Créer un champ personnalisé « url_3d »
Dans l’éditeur wordpress, dans un article, créez le champ personnalisé « url_3d ».
8. Récupérer la valeur du champ « url_3d » dans le script
Éditez le fichier content.php (l’affichage du contenu d’un article) et copier ce code DANS le php en haut de l’article de l’article <?php /** * Template part for displaying posts * * @link https://developer.wordpress.org/themes/basics/template-hierarchy/ * * @package Capture3d */
Éditez le fichier functions.php et copier cette fonction:
/**
 * Autoriser l'upload de tous types de format dans les médias
 */


add_filter('upload_mimes', 'wpm_myme_types', 1, 1);

function wpm_myme_types($mime_types){
	$mime_types['svg'] = 'application/postscript'; //On autorise les .svg
    $mime_types['glb'] = 'application/postscript'; //On autorise les .glb
    return $mime_types;
}
3. Copier le script dans le header.php
Éditez le fichier header.php et copier ce script juste après le début su div id= »page »:
4. Intégrer le script dans le contenu de vos articles
Éditez le fichier content.php (l’affichage du contenu d’un article) et copier ce script JUSTE AVANT la fermeture de l’article </article><!-- #post-<?php the_ID(); ?> -->
<script type="module">


 import * as THREE from 'three';
 import { OrbitControls } from  '<?php bloginfo('template_directory'); ?>/threejs/node_modules/three/examples/jsm/controls/OrbitControls.js';
 import { GLTFLoader } from '<?php bloginfo('template_directory'); ?>/threejs/node_modules/three/examples/jsm/loaders/GLTFLoader.js';
 import { DRACOLoader } from '<?php bloginfo('template_directory'); ?>/threejs/node_modules/three/examples/jsm/loaders/DRACOLoader.js';


let container, containerBox;
let cameraPersp, cameraOrtho, currentCamera;
let orbit, scene, raycaster, renderer, control;
const clock = new THREE.Clock();


init();
render();
animate();


function init() {
 container = document.getElementById( 'capture-<?php the_ID(); ?>' );
 containerBox = container.getBoundingClientRect();
 console.log(containerBox.width, containerBox.height);

 renderer = new THREE.WebGLRenderer( { alpha: true } );
 renderer.setPixelRatio( window.devicePixelRatio );
 renderer.setSize( containerBox.width, containerBox.height );
 // setClearColor(Couleur de fond de la 3D, transparance de 0 à 1)
 renderer.setClearColor( 0xffffff, 0 ); // the default

 container.appendChild( renderer.domElement );
 const aspect = containerBox.width / containerBox.height;

 // THREE.PerspectiveCamera(Champ de Vision FOV, ratio, près, loin)
 // currentCamera.position.set(x,y,z) // position de la caméra
 cameraPersp = new THREE.PerspectiveCamera( 33, aspect, 0.1, 1500 );
 currentCamera = cameraPersp;
 currentCamera.position.set( 1, 1, 0);
 currentCamera.lookAt( 0, 0, 0 );

 scene = new THREE.Scene();
 // THREE.Fog(Couleur du brouillard, transparance de 0 à 1, distance)
 scene.fog = new THREE.Fog( 0xffffff, 1, 1500 );

 // THREE.HemisphereLight(Couleur du la lumière, Couleur de l'ombre)
 const hemiLight = new THREE.HemisphereLight( 0xffffff, 0xffffff );
 // hemiLight.position.set(x,y,z) // Position de la lumière en x,y,z
 hemiLight.position.set( 0, 50, 0 );
 scene.add( hemiLight );

 const dracoLoader = new DRACOLoader();
 dracoLoader.setDecoderPath( '<?php bloginfo('template_directory'); ?>/threejs/node_modules/three/examples/js/libs/draco/gltf/' );

 const loader = new GLTFLoader();
 loader.setDRACOLoader( dracoLoader );

 loader.load( '<?php echo $captureUrl;  ?>', function ( gltf )  {
	 const model = gltf.scene;
	 model.name = 'capture-<?php echo $captureId; ?>'
	 //position initiale
	 model.position.set( 0, 0, 0 );
	 //taille initiale
	 model.scale.set( 1, 1, 1 );
	 scene.add( model );
 });

 orbit = new OrbitControls( currentCamera, renderer.domElement );
 orbit.update();
 orbit.addEventListener( 'change', render );

 window.addEventListener( 'resize', onWindowResize );
}

function onWindowResize() {
 const aspect = containerBox.width / containerBox.height;
 cameraPersp.aspect = aspect;
 cameraPersp.updateProjectionMatrix();
 renderer.setSize( containerBox.width, containerBox.height );
 render();
}

function animate() {
requestAnimationFrame( animate );
renderer.render( scene, currentCamera );
}

function onPointerMove( event ) {
 pointer.x = ( event.clientX / containerBox.width ) * 2 - 1;
 pointer.y = - ( event.clientY / containerBox.height ) * 2 + 1;
}

function render() {
 renderer.render( scene, currentCamera );
}

</script>
5. Intégrer la zone d’affichage de l’objet 3D
Éditez toujours le fichier content.php (l’affichage du contenu d’un article) et copier ce code JUSTE APRÈS l’ouverture de l’article <article id="post-<?php the_ID(); ?>" <?php post_class(); ?>>
Éditez le fichier style-custom.css et définissez la hauteur du canvas
/*
** 3D
*/
.canvas-box {
    height: 500px;
}
7. Créer un champ personnalisé « url_3d »
Dans l’éditeur wordpress, dans un article, créez le champ personnalisé « url_3d ».
8. Récupérer la valeur du champ « url_3d » dans le script
Éditez le fichier content.php (l’affichage du contenu d’un article) et copier ce code DANS le php en haut de l’article de l’article <?php /** * Template part for displaying posts * * @link https://developer.wordpress.org/themes/basics/template-hierarchy/ * * @package Capture3d */
N’oubliez pas remplacer is_category(‘books’) par is_category(‘slugdevotrecategorie’) ou, pour plusieurs catégories: is_category(array(‘slugdevotrecategorie1’,‘slugdevotrecategorie2‘,’slugdevotrecategorie3′)) ou